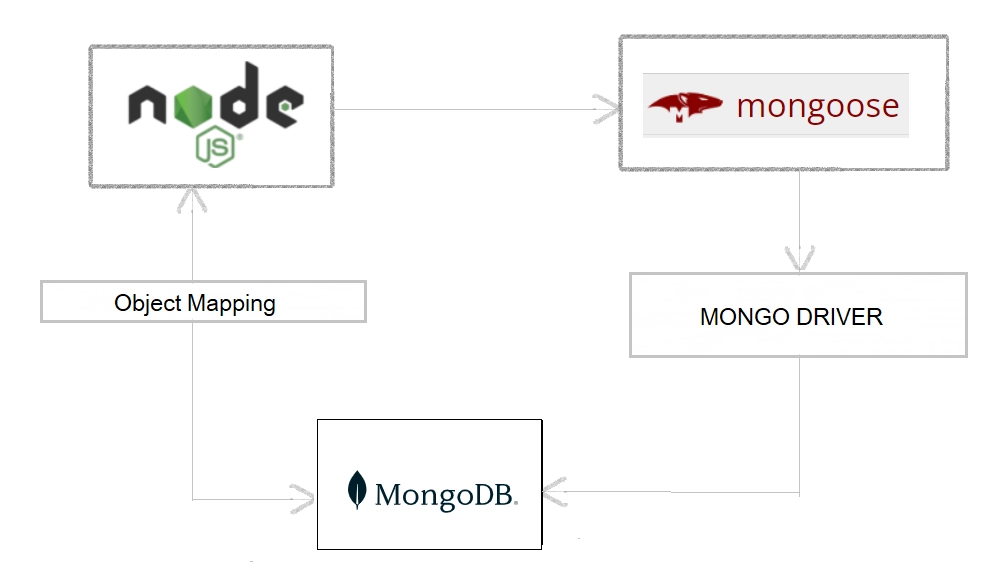
Mongoose is an Object Data Modeling (ODM) library for MongoDB and Node.js that provides a robust, flexible schema-based solution for modeling your application data. One of its most powerful features is the populate method. This method allows you to replace specified paths in a document with documents from other collections, essentially joining data from multiple collections seamlessly.
In this article, we’ll explore How work populate Method in Mongoose: Understanding Mongodb Query method in-depth, covering its various options, use cases, and best practices. By the end, you’ll have a thorough understanding of how to use populate to optimize your Mongoose queries and improve the efficiency and readability of your MongoDB operations.

What is the Populate Method?
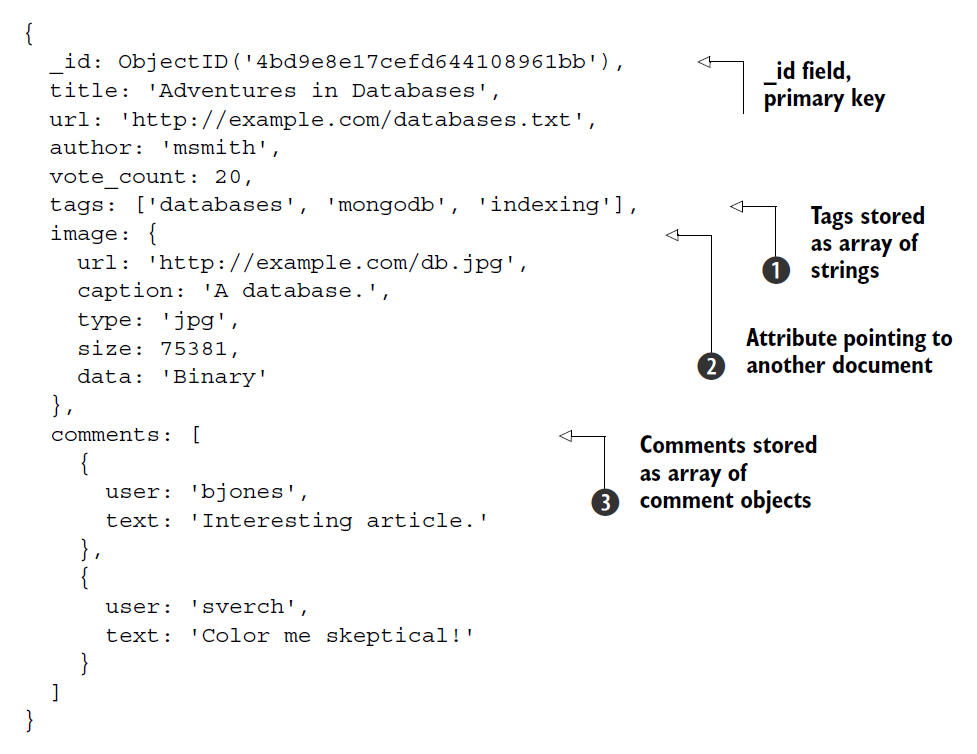
The populate method in Mongoose is used to replace references (usually stored as ObjectIds) in a document with the actual documents from the referenced collection. This is particularly useful when you have related data stored in separate collections, and you want to combine them into a single query result.
For example, consider a scenario where you have a User collection and an Order collection. Each order document has a reference to a user. Using populate, you can replace the user reference in an order document with the actual user document.
Basic Usage of Populate
Here’s a simple example to illustrate the basic usage of the populate method:
Example:
const mongoose = require('mongoose');
const Schema = mongoose.Schema;

// Define User schema
const UserSchema = new Schema({
  name: String,
  email: String
});

// Define Order schema
const OrderSchema = new Schema({
  product: String,
  quantity: Number,
  user: { type: Schema.Types.ObjectId, ref: 'User' }
});

const User = mongoose.model('User', UserSchema);
const Order = mongoose.model('Order', OrderSchema);

mongoose.connect('mongodb://localhost:27017/populateExample', { useNewUrlParser: true, useUnifiedTopology: true });

(async () => {
  // Create a user
  const user = await User.create({ name: 'John Doe', email: 'john.doe@example.com' });

  // Create an order referencing the user
  const order = await Order.create({ product: 'Laptop', quantity: 1, user: user._id });

  // Find the order and populate the user field
  const populatedOrder = await Order.findById(order._id).populate('user');
  console.log(populatedOrder);

  mongoose.connection.close();
})();
- We define
UserandOrderschemas. - An order document references a user document via the
userfield. - Using
populate, we replace theuserObjectId in the order document with the actual user document.
Understanding the Populate Options
The populate method offers several options to fine-tune its behavior. The most commonly used options are:
- path: Specifies the field in the document that contains the reference to other documents. This is the field that you want to populate with actual data instead of just an ObjectId.
- model: Specifies the model to use for population. This tells Mongoose which model to use to find the referenced documents.
- select: Specifies the fields to include or exclude from the populated documents. This helps to limit the data returned, improving query performance and ensuring only necessary data is included.
- match: Specifies query conditions to filter the populated documents.
- options: Specifies additional query options such as sort, limit, and skip.

Let’s explore each of these options in more detail.
Path
The path option is the most fundamental option of the populate method. It tells Mongoose which field to populate. For example:
const populatedOrder = await Order.findById(order._id).populate('user');In this case, the path is ‘user‘, meaning Mongoose will look for the ‘user‘ field in the Order document and replace the ‘ObjectId’ with the actual ‘User‘ document
Model
The ‘model‘ option is used when the field to be populated references a different model than the one inferred by Mongoose. This can happen if your schema references multiple models or if you want to ensure the correct model is used.
const populatedOrder = await Order.findById(order._id).populate({
  path: 'user',
  model: 'User'
});
Here, we explicitly specify the ‘User‘ model for the ‘user‘ field. This ensures that Mongoose uses the correct model even if the schema definitions are complex.
Select
The select option allows you to specify which fields to include or exclude from the populated documents. This is useful for limiting the amount of data returned and optimizing query performance.
const populatedOrder = await Order.findById(order._id).populate({
  path: 'user',
  select: 'name email'
});
In this example, only the ‘name‘ and ‘email‘ fields of the ‘User‘ document will be included in the populated data.
Match
The match option allows you to apply additional query conditions to the documents being populated. This can be useful for filtering the populated documents based on certain criteria.
const populatedOrder = await Order.findById(order._id).populate({
  path: 'user',
  match: { email: /example\.com$/ }
});
Here, only ‘User‘ documents with an email ending in example.com will be populated. This can help narrow down the populated data to meet specific requirements.
Options
The options option allows you to apply additional query options such as sort, limit, and skip to the population query. This is useful for fine-tuning the results of the population.
const populatedOrder = await Order.findById(order._id).populate({
  path: 'user',
  options: { sort: { name: 1 }, limit: 1 }
});
In this example, the populated ‘User‘ documents will be sorted by ‘name‘ in ascending order and limited to one result.
Advanced Usage of Populate
The ‘populate‘ method can be used in more advanced scenarios, such as nested population and multiple field population. Let’s explore these advanced use cases.
Nested Population
Nested population allows you to populate fields within populated documents. For example, if you have a ‘Comment‘ model that references a ‘User‘ model and you want to populate the user details within a populated comment, you can use nested population.
const mongoose = require('mongoose');
const Schema = mongoose.Schema;

// Define User schema
const UserSchema = new Schema({
  name: String,
  email: String
});

// Define Comment schema
const CommentSchema = new Schema({
  content: String,
  user: { type: Schema.Types.ObjectId, ref: 'User' }
});

// Define Post schema
const PostSchema = new Schema({
  title: String,
  content: String,
  comments: [{ type: Schema.Types.ObjectId, ref: 'Comment' }]
});

const User = mongoose.model('User', UserSchema);
const Comment = mongoose.model('Comment', CommentSchema);
const Post = mongoose.model('Post', PostSchema);

mongoose.connect('mongodb://localhost:27017/populateExample', { useNewUrlParser: true, useUnifiedTopology: true });

(async () => {
  // Create a user
  const user = await User.create({ name: 'Jane Doe', email: 'jane.doe@example.com' });

  // Create a comment referencing the user
  const comment = await Comment.create({ content: 'Great post!', user: user._id });

  // Create a post referencing the comment
  const post = await Post.create({ title: 'My First Post', content: 'Hello world!', comments: [comment._id] });

  // Find the post and populate the comments and user within each comment
  const populatedPost = await Post.findById(post._id).populate({
    path: 'comments',
    populate: {
      path: 'user',
      select: 'name email'
    }
  });

  console.log(populatedPost);

  mongoose.connection.close();
})();
How work Populate Method in Mongoose: Understanding Mongodb Query
Mongoose is an Object Data Modeling (ODM) library for MongoDB and Node.js that provides a robust, flexible schema-based solution for modeling your application data. One of its most powerful features is the populate method. This method allows you to replace specified paths in a document with documents from other collections, essentially joining data from multiple collections seamlessly.
In this article, we’ll explore the populate method in-depth, covering its various options, use cases, and best practices. By the end, you’ll have a thorough understanding of how to use populate to optimize your Mongoose queries and improve the efficiency and readability of your MongoDB operations.
What is the populate Method?
The populate method in Mongoose is used to replace references (usually stored as ObjectIds) in a document with the actual documents from the referenced collection. This is particularly useful when you have related data stored in separate collections and you want to combine them into a single query result.
For example, consider a scenario where you have a User collection and an Order collection. Each order document has a reference to a user. Using populate, you can replace the user reference in an order document with the actual user document.
Basic Usage of populate
Here’s a simple example to illustrate the basic usage of the populate method:
const mongoose = require('mongoose');
const Schema = mongoose.Schema;

// Define User schema
const UserSchema = new Schema({
  name: String,
  email: String
});

// Define Order schema
const OrderSchema = new Schema({
  product: String,
  quantity: Number,
  user: { type: Schema.Types.ObjectId, ref: 'User' }
});

const User = mongoose.model('User', UserSchema);
const Order = mongoose.model('Order', OrderSchema);

mongoose.connect('mongodb://localhost:27017/populateExample', { useNewUrlParser: true, useUnifiedTopology: true });

(async () => {
  // Create a user
  const user = await User.create({ name: 'John Doe', email: 'john.doe@example.com' });

  // Create an order referencing the user
  const order = await Order.create({ product: 'Laptop', quantity: 1, user: user._id });

  // Find the order and populate the user field
  const populatedOrder = await Order.findById(order._id).populate('user');
  console.log(populatedOrder);

  mongoose.connection.close();
})();
In this example:
- We define
UserandOrderschemas. - An order document references a user document via the
userfield. - Using
populate, we replace theuserObjectId in the order document with the actual user document.
Understanding the populate Options
The populate method offers several options to fine-tune its behavior. The most commonly used options are:
- path: Specifies the field in the document that contains the reference to other documents. This is the field that you want to populate with actual data instead of just an ObjectId.
- model: Specifies the model to use for population. This tells Mongoose which model to use to find the referenced documents.
- select: Specifies the fields to include or exclude from the populated documents. This helps to limit the data returned, improving query performance and ensuring only necessary data is included.
- match: Specifies query conditions to filter the populated documents.
- options: Specifies additional query options such as sort, limit, and skip.

Let’s explore each of these options in more detail.
Path
The path option is the most fundamental option of the populate method. It tells Mongoose which field to populate. For example:
const populatedOrder = await Order.findById(order._id).populate('user');In this case, the path is user, meaning Mongoose will look for the user field in the Order document and replace the ObjectId with the actual User document.
Model
The model option is used when the field to be populated references a different model than the one inferred by Mongoose. This can happen if your schema references multiple models or if you want to ensure the correct model is used.
const populatedOrder = await Order.findById(order._id).populate({
  path: 'user',
  model: 'User'
});
Here, we explicitly specify the User model for the user field. This ensures that Mongoose uses the correct model even if the schema definitions are complex.
Select
The select option allows you to specify which fields to include or exclude from the populated documents. This is useful for limiting the amount of data returned and optimizing query performance.
const populatedOrder = await Order.findById(order._id).populate({
  path: 'user',
  select: 'name email'
});
In this example, only the name and email fields of the User document will be included in the populated data.
Match
The match option allows you to apply additional query conditions to the documents being populated. This can be useful for filtering the populated documents based on certain criteria.
const populatedOrder = await Order.findById(order._id).populate({
  path: 'user',
  match: { email: /example\.com$/ }
});
Here, only User documents with an email ending in example.com will be populated. This can help narrow down the populated data to meet specific requirements.
Options
The options option allows you to apply additional query options such as sort, limit, and skip to the population query. This is useful for fine-tuning the results of the population.
const populatedOrder = await Order.findById(order._id).populate({
  path: 'user',
  options: { sort: { name: 1 }, limit: 1 }
});
In this example, the populated User documents will be sorted by name in ascending order and limited to one result.
Advanced Usage of populate
The populate method can be used in more advanced scenarios, such as nested population and multiple field population. Let’s explore these advanced use cases.

Nested Population
Nested population allows you to populate fields within populated documents. For example, if you have a Comment model that references a User model and you want to populate the user details within a populated comment, you can use nested population.
const mongoose = require('mongoose');
const Schema = mongoose.Schema;

// Define User schema
const UserSchema = new Schema({
  name: String,
  email: String
});

// Define Comment schema
const CommentSchema = new Schema({
  content: String,
  user: { type: Schema.Types.ObjectId, ref: 'User' }
});

// Define Post schema
const PostSchema = new Schema({
  title: String,
  content: String,
  comments: [{ type: Schema.Types.ObjectId, ref: 'Comment' }]
});

const User = mongoose.model('User', UserSchema);
const Comment = mongoose.model('Comment', CommentSchema);
const Post = mongoose.model('Post', PostSchema);

mongoose.connect('mongodb://localhost:27017/populateExample', { useNewUrlParser: true, useUnifiedTopology: true });

(async () => {
  // Create a user
  const user = await User.create({ name: 'Jane Doe', email: 'jane.doe@example.com' });

  // Create a comment referencing the user
  const comment = await Comment.create({ content: 'Great post!', user: user._id });

  // Create a post referencing the comment
  const post = await Post.create({ title: 'My First Post', content: 'Hello world!', comments: [comment._id] });

  // Find the post and populate the comments and user within each comment
  const populatedPost = await Post.findById(post._id).populate({
    path: 'comments',
    populate: {
      path: 'user',
      select: 'name email'
    }
  });

  console.log(populatedPost);

  mongoose.connection.close();
})();
In this example:
- We define
User,Comment, andPostschemas. - Post document references comment documents, and each comment references a user document.
- Using nested population, we populate the
commentsfield in thePostdocument and theuserfield within eachCommentdocument.
Multiple Field Population
You can use the populate method to populate multiple fields in a single query. This is useful when a document has references to multiple other documents that you want to populate.
const populatedPost = await Post.findById(post._id).populate([
  { path: 'comments' },
  { path: 'author', select: 'name' }
]);
In this example, we populate both the comments field and the author field in the Post document. The author field is populated with only the name field included.
Best Practices for Using populate
While the populate method is a powerful tool, it’s important to use it judiciously to ensure optimal performance and maintainability. Here are some best practices for using populate effectively:
Limit the Data Returned
Use the select option to limit the fields returned in the populated documents. This helps reduce the amount of data transferred and improves query performance.
const populatedOrder = await Order.findById(order._id).populate({
  path: 'user',
  select: 'name email'
});
Use Nested Population Sparingly
Nested population can be powerful but can also lead to complex and potentially slow queries. Use it sparingly and only when necessary. Consider denormalizing your data if you find yourself frequently using deep nested population.

Apply Query Conditions
Use the match option to apply additional query conditions to the populated documents. This helps filter the populated data and ensures you only retrieve the necessary documents.
const populatedOrder = await Order.findById(order._id).populate({
  path: 'user',
  match: { email: /example\.com$/ }
});
Optimize Query Performance
Use the options option to apply additional query options such as sort, limit, and skip. This helps optimize the query performance and fine-tune the results of the population.
const populatedOrder = await Order.findById(order._id).populate({
  path: 'user',
  options: { sort: { name: 1 }, limit: 1 }
});
Avoid Over-Populating
Overusing the ‘populate‘ method can lead to performance issues, especially with large datasets. Be mindful of the impact on performance and consider alternatives such as denormalization or caching if you encounter performance bottlenecks.
Real-World Example: Excluding Fields with populate
Let’s look at a real-world example where you need to exclude specific fields from the populated documents. In this scenario, we have a UserInsuranceProgress model that references an InsuranceType model. We want to populate the insurance_type field but exclude the term_and_condition field from the populated data.

Defining the Schemas
First, we define the schemas for UserInsuranceProgress and InsuranceType:
const mongoose = require('mongoose');
const Schema = mongoose.Schema;

// Define InsuranceType schema
const InsuranceTypeSchema = new Schema({
  insurance_type_id: { type: Schema.Types.ObjectId, ref: 'InsuranceType' },
  name: String,
  amount: String,
  term_and_condition: String
});

// Define UserInsuranceProgress schema
const UserInsuranceProgressSchema = new Schema({
  user_id: { type: Schema.Types.ObjectId, ref: 'User' },
  insurance_id: { type: Schema.Types.ObjectId, ref: 'Insurance' },
  insurance_type: { type: Schema.Types.ObjectId, ref: 'InsuranceType' },
  is_expired: Boolean,
  status: String,
  validity_start_date: Date,
  validity_end_date: Date,
  user_progress: {
    is_vip: Number,
    contest_play: Number,
    game_play: Number,
    is_requested: Boolean,
    is_eligible: Boolean,
    is_panlty: Boolean,
    panlty_pay_status: Boolean
  },
  createdAt: Date,
  updatedAt: Date
});

const UserInsuranceProgress = mongoose.model('UserInsuranceProgress', UserInsuranceProgressSchema);
const InsuranceType = mongoose.model('InsuranceType', InsuranceTypeSchema);
Querying and Populating with Exclusions
Next, we write a query to find a UserInsuranceProgress document and populate the insurance_type field while excluding the term_and_condition field:
(async () => {
  await mongoose.connect('mongodb://localhost:27017/yourDatabase', { useNewUrlParser: true, useUnifiedTopology: true });

  const _id = mongoose.Types.ObjectId("65af8ea089ce13479d3391d3"); // Example user ID

  // Find the user insurance progress and populate the insurance_type field, excluding term_and_condition
  let insurance_details_obj = await UserInsuranceProgress.findOne({ user_id: _id, is_expired: false })
    .populate({
      path: 'insurance_type',
      model: 'InsuranceType',
      select: 'insurance_type_id name amount -term_and_condition' // Exclude term_and_condition
    })
    .select('_id user_id insurance_id insurance_type is_expired status validity_start_date validity_end_date');

  console.log(JSON.stringify(insurance_details_obj, null, 2));

  mongoose.connection.close();
})();
Example Output
Here’s what the output might look like, excluding the term_and_condition field:
{
  "_id": "6659a5b3a957b850663e8224",
  "user_id": "65af8ea089ce13479d3391d3",
  "insurance_id": "66599602de1e55806d3a92eb",
  "insurance_type": {
    "_id": "66599602de1e55806d3a92ec",
    "insurance_type_id": "66599602de1e55806d3a92ec",
    "name": "MEDICAL",
    "amount": "30 Lakh"
  },
  "is_expired": false,
  "status": "pending",
  "validity_start_date": null,
  "validity_end_date": null
}
Detailed Explanation
- UserInsuranceProgress Schema:
user_id: Reference to theUsermodel.insurance_id: Reference to theInsurancemodel.insurance_type: Reference to theInsuranceTypemodel.is_expired,status,validity_start_date,validity_end_date: Various fields related to the insurance progress.user_progress: Nested object containing various user progress details.createdAt,updatedAt: Timestamps for the document.
- InsuranceType Schema:
insurance_type_id: Reference to anotherInsuranceTypemodel.name: Name of the insurance type.amount: Coverage amount.term_and_condition: Terms and conditions of the insurance.
Query Breakdown
- Find One UserInsuranceProgress:
findOne({ user_id: _id, is_expired: false }): Finds a single document inUserInsuranceProgresswhereuser_idmatches_idandis_expiredisfalse.
- Populate InsuranceType:
populate ({ path: 'insurance_type', model: 'InsuranceType', select: 'insurance_type_id name amount -term_and_condition' }): Populates theinsurance_typefield from theInsuranceTypemodel, selecting only theinsurance_type_id,name, andamountfields while excludingterm_and_condition.
- Select Specific Fields:
select('_id user_id insurance_id insurance_type is_expired status validity_start_date validity_end_date'): Limits the fields returned in theUserInsuranceProgressdocument to_id,user_id,insurance_id,insurance_type,is_expired,status, validity_start_date, andvalidity_end_date.
This setup should correctly return the document with the required fields, excluding the term_and_condition from the populated insurance_type field.
Conclusion
The populate method in Mongoose is a powerful tool for working with related data in MongoDB. By understanding its various options and best practices, you can optimize your queries and ensure your applications are efficient and maintainable. Whether you are working with simple references or complex nested structures, populate provides the flexibility and power you need to handle your data relationships effectively.
References
This article was crafted based on extensive research and practical experience with MongoDB and Mongoose. The information and examples provided are designed to help developers understand and effectively use the populate method in Mongoose.
Here are some key references and sources that were used to ensure the accuracy and comprehensiveness of this guide:
- Mongoose Documentation:
- The official Mongoose documentation provides detailed information on the
populatemethod, including all available options and configurations. - Mongoose Populate Method
- The official Mongoose documentation provides detailed information on the
- MongoDB Documentation:
- Understanding MongoDB’s data modeling concepts is crucial for effectively using Mongoose. The MongoDB documentation provides insights into data relationships and schema design.
- MongoDB Data Modeling
- Practical MongoDB Aggregations:
- This resource offers practical examples of using MongoDB’s aggregation framework, which can complement the use of the
populatemethod in complex queries. - Practical MongoDB Aggregations
- This resource offers practical examples of using MongoDB’s aggregation framework, which can complement the use of the
- Stack Overflow:
- Community-driven Q&A platform where developers share their challenges and solutions related to Mongoose and MongoDB.
- Mongoose Populate on Stack Overflow
- Medium Articles and Tutorials:
- Various tutorials and articles on platforms like Medium provide practical use cases and examples of the
populatemethod in real-world applications. - Example: Populating Documents with Mongoose
- Various tutorials and articles on platforms like Medium provide practical use cases and examples of the
- GitHub Repositories:
- Open-source projects on GitHub that implement complex data models and use the
populatemethod effectively. - Example: Mongoose Populate Example
- Open-source projects on GitHub that implement complex data models and use the
These references collectively provide a comprehensive understanding of how to use the ‘populate‘ method in Mongoose effectively. By consulting these resources, developers can gain deeper insights and practical knowledge, enhancing their ability to build robust applications with MongoDB and Mongoose.
Read More – AWS SQS with Lambda function integration

How AI and ChatGPT Technology Transform the Next Industrial Revolution

Best Free AI Image Generator Tool: Ideogram AI

GPT-4o: How ChatGPT-Integrates Audio, Vision, and Text

Explanation of Multimodal GEMINI AI

How to AI-Proof Your Writing Assignments: Top 5 Powerful Strategies for Using AI and ChatGPT in Education

Top 5 Best Programming Languages In-Demand to Skyrocket Your Career in 2024

What is React JS: How To Learn React JS in 2024

How Functions Work in JavaScript: A Beginner-Friendly Guide with Examples

Transforming the Future of Google Search: OpenAI’s SearchGPT Revolution


